Setup Your Rr.com Account with Your Email Program Using IMAP
Setup Your Rr.com Account with Your Email Program Using IMAP
Blog Article
Introduction
Setting up your RR.com Roadrunner email account with an email program using IMAP (Internet Message Access Protocol) allows you to access and manage your emails across multiple devices seamlessly. This guide provides step-by-step instructions on how to configure your RR.com email account using IMAP in popular email programs ensuring you can efficiently send, receive, and organize emails.
Prerequisites
Before you begin setting up your RR.com email account using IMAP, ensure you have the following information ready:
- RR.com Email Address: Your full RR.com email address .
- RR.com Email Password: The password associated with your RR.com email account.
- IMAP Server Settings: Specific IMAP server settings for RR.com, which are typically provided by Spectrum (formerly Time Warner Cable).
Steps to Setup RR.com Account Using IMAP
Follow these steps to set up your RR.com email account using IMAP in your preferred email program:
Step 1: Open Your Email Program
- Launch Your Email Program: Open the email program you want to use to access your RR.com email account. This could be Microsoft Outlook, Apple Mail, Thunderbird, or another compatible email client.
Step 2: Add New Email Account
- Navigate to Account Settings: Look for an option like "Account Settings," "Preferences," or "Accounts" depending on your email program.
- Add New Account: Click on "Add Account" or a similar option to begin setting up a new email account.
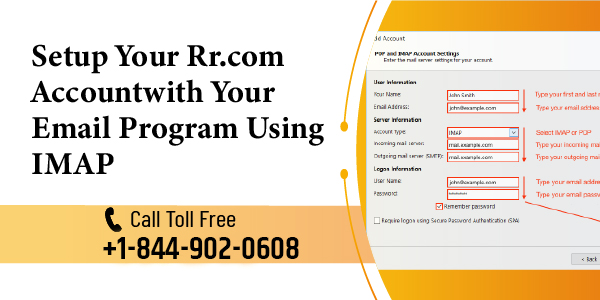
Step 3: Enter Your RR.com Account Details
- Enter Your Name and RR.com Email Address: Provide your name as you want it to appear in outgoing emails and enter your full RR.com email address.
- Choose IMAP as Account Type: Select IMAP as the account type to sync emails across multiple devices.
Step 4: Configure IMAP Server Settings
- Incoming Mail Server (IMAP):
- Server Name: Enter
mail.twc.comas the incoming mail server (IMAP).
- Port: Use port
993.
- Security: Select SSL/TLS for encryption.
- Server Name: Enter
- Outgoing Mail Server (SMTP):
- Server Name: Enter
mail.twc.comas the outgoing mail server (SMTP).
- Port: Use port
587.
- Security: Choose STARTTLS for encryption.
- Server Name: Enter
- Authentication: Ensure your email program is set to use password authentication. Enter your RR.com email address and password when prompted.
Step 5: Verify and Finish Setup
- Test Account Settings: After entering all necessary information, some email programs may allow you to test the account settings to ensure everything is configured correctly.
- Finish Setup: Once your email program confirms the settings are correct and your RR.com account is added successfully, you can start using your RR.com email through the email program.
Additional Tips
- Sync Frequency: Adjust the sync frequency settings in your email program to automatically fetch new emails at your preferred intervals.
- Security: Always use SSL/TLS encryption for both incoming and outgoing mail servers to secure your RR.com email communications.
- IMAP Benefits: IMAP allows you to access and manage your RR.com emails across multiple devices while keeping them synchronized.
Conclusion
Setting up your RR.com email account with your preferred email program using IMAP ensures you can efficiently manage your emails, access them from various devices, and benefit from synchronization capabilities. By following the steps outlined in this guide and ensuring correct server settings and authentication, you can seamlessly integrate your RR.com email into your daily communication routine, enhancing your productivity and convenience. If you encounter any issues during setup, refer back to this guide or consult Spectrum's support for further assistance.